Thursday, December 31, 2015

Mosaics

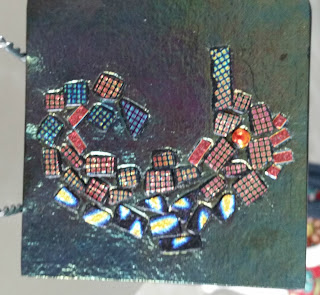
I really enjoy working with mosaics.  I have created several ceramic mosaic pieces and even completed on glass mosaic, but have not done a mosaic piece for fusing.

The first piece I completed was on a 6x6 tile of clear glass.  I formed a fish using several colors of transparent glass in blues and greens.  I cut odd shaped random sized pieces from each color.  Then I filled in around the fish with clear glass cut the same way.  Newy Fagan helped out by filling in some of the larger gaps with smaller clear glass pieces (which enhanced the overall look).  The tile was then fired to a tac* fuse (the glass adheres but doesn't become fully fused leaving texture).
Then, using a mixture of CMC (a cellulose fiber used as a binder in foods like taco shells) and glass powder (black in this case), the glass pieces were grouted.  The tile was then fired again using a tac* fuse  to leave the texture and here are the results.
I wish I had used a different color for the face than dark blue, but I didn't know what it was going to come out looking like!

I really got into this method of creating.  So much so that I used it again twice! during the workshop.
Here is a second piece.  This tile was also created on clear glass.  I used a turquoise powder for the grout.  Then I fused the whole piece onto white glass to give the design more contrast.  
This tile was fired on a full fuse, therefore, the glass is flat.
I like the blue powder, but think a darker blue would give the piece more contrast.

*  Newy has her own firing schedules, so technically, I don't know that she calls the schedule we used as a "tac" fuse.  But for the beginner mind, like myself, I am using terms that can more easily be conveyed.  The terms I use are "slump, tac, contour, and full" when talking about firing schedules.
Wednesday, December 30, 2015

Inclusion

Inclusion is placing glass or other items between glass before firing.  Most of the time, glass is stacked (placed on top of another piece of glass).  Products like Mica powder have to be used between the glass.  Inclusion gives interesting results.  The most notable are the tiny air bubbles created where air is trapped between the glass.  When items are placed between two pieces of glass, a small space is created between the glass.  As the glass warms and begins to fuse together, some of the air from the space is trapped and forms small air bubbles.

I did this piece experimenting with copper mesh, dichroic (metallic looking) glass, stringer, and decals.  I like the shapes, color, and movement of abstract art.

Recently, I tried a piece of copper mesh between float glass (window glass).  I fired it to a contour fire (not quite as hot as a full fire).  I don't really notice any air bubbles in this piece.  What you can't really see above is there are tiny air bubbles inside the mesh of the copper pieces above.

In the piece below, I placed a green grape vine leaf in between two pieces of float glass and fired to a contour.  Most of the leaf burned off and left an ash impression.  There is a small piece in the middle that didn't burn off completely.  When I picked up the glass the small leaf piece slipped.  Had I used a full fire (higher temperature than contour), I believe the entire leaf would have burned off.  I will definitely do this again.  I like the results. 


Monday, December 28, 2015

My personal Joan Miro art

I love the work of the artist Joan Miro.  In fact, when I was in my 20's, I had a signed and numbered print of his.  But as youth goes, it got lost in the moves, etc.  I was too naive at the time to know what I had.  

At any rate, while working with Newy Fagan in her studio, I experimented with combing glass.  This technique involved raking warm glass with a combing tool (similar to a metal chopstick for reference).  

Combing proved to be more difficult for me than I thought it would be.  First of all, I didn't expect the heat of the kiln to be as intense as it was.  I had never had a hot kiln open more than a few seconds to look at the progress of my work.  Also, the glass was not as fluid as I had imagined it to be.  The only experience I had at this point with hot glass was working with molten glass during glass blowing.

In building the glass tile to comb, I used rod pieces that made small circles as well as some string, curly glass pieces that Newy made by pouring molten glass on a piece of sheet metal.

I combed the piece the best I could and then Newy took a go at it.  It turns out, the small round pieces of color were really too small to get much of a design out of with the combing technique.

The piece was left in the kiln to anneal.  The next morning, when we opened the kiln to look at it, the tile had cracked in 3 pieces.  But I loved it.  Why? because it reminded me of the work of Joan Miro.

I brought the pieces home and resurrected the tile by adding a few more colored circles and black curly pieces then firing to a full fuse.

This is what I got.  To many of you, it won't look like much, but to me, I get a good feeling looking at it because of its resemblance to the work of one of my favorite artists.  Joan Miro created work on an entirely different level than this, but the elements are there.

I plan on tac fusing it to a piece of 8x8 clear glass and framing it in black to hang as wall art. the colored pieces that look like they are dripping are the parts that were combed while in the kiln.  Beauty is definitely in the  eye of the beholder!


Joan Miro:

Tuesday, December 22, 2015

Front to Back

I learned something about iridized glass.  It actually is more iridized looking if the iridized side is placed face down for firing.  Not only that, the glass has a texture too it.  The upside is glossy and the back side is matte.

In this project, I made a  4x4" tile on green/black iridized glass.  I believe it was
Spectrum irid 96 -- but honestly can't recall..  I fashioned a seahorse out of dichroic chips and glued them to the iridized side of glass.

Then the tile was placed faced down on some pre-fired 1/32" fiber paper and fired.

The result was beautiful.  Because the irid glass reflects light, the picture doesn't do it justice.

I cannot get the second photo to post straight up.. no matter how I rotate and save it!

Monday, December 21, 2015

Bas Relief day 2

Newy and I did two more bas relief sculptures.

Newy showed me the technique of using the positive images in the fiber mold on the right.  Pieces were cut out and placed on the placemat fiber.  The glass was then placed on top of the fiber paper shapes so it would drape over the shapes when fired.
After firing: 

This piece of glass work is on the way to becoming a wind chime!

  I wanted to use both the positive and negative images in this sculpture.  The fiber mold on the left has both.  On the left, I cut out the sea grass and placed the positive pieces on the right over the fish shape I cut out.  The positive fish shape was placed over the cut out sea grass on the left. The eyes followed the same placement -- positive placed in negative fish and negative left in positive fish.
After firing:

Tomorrow:  Firing right side down. 

Saturday, December 19, 2015

Bas Relief: Day 1

We started our workshop doing bas relief, a method of carving an image that is slightly raised from the flat background.

To do this, fiber paper is used.  Fiber paper is a heat resistant paper made with alumina silicate fibers.   Images are carved out of the paper using an Exacto knife.  The carved image pieces can be used under the glass to leave a raised image in the glass.  The carved out piece can be placed under the glass so the glass sinks or sagged into the vacant areas when fused creating the images.


In the first sculpture (the birds), the carved out sheet of fiber paper was used.  The flat, clear glass sheets were cut to fit the perimeter of the fiber paper and placed on top.
Here are the results.
This is one piece of glass, turned front and back to show you the two different effects of using positive (draping over the fiber paper) and negative (slumping into the fiber paper).
Here, the birds protrude slightly from the background, while their wings (cut out of the original image) are the same level as the flat background and appear indented.  This is the image that results from using the positive (or cut out pieces) technique.
Here the birds are slightly indented from the flat foreground, while their wings (added back to the cut out image) are even with the flat foreground, but look slightly raised.  This image view results from using the negative technique.

Either way, I am happy with the results.  It almost looks like snow in the background.  Those are tiny air bubbles in between the glass.  Two sheets of COE 96 clear glass were used in this project.

I will write tomorrow about the other two pieces.  Visit www.seazeningwithglass.blogspot.com for more workshop stories.

Friday, December 18, 2015

3 days of Warm Glass Heaven

I recently returned from a 3 day Warm Glass Workshop with master glass artist, Newy Fagan.

Newy has been creating in warm glass since the late 70s.  She is most known for developing a technique to manipulate glass while it is in the malleable stage in the kiln.  She creates horse sculptures that stand on their own as a result of this technique.
Newy has her horses in galleries all over the country.  Visit http://www.turqtortsedona.com/Artists/fagan/index.htm to read more about what this gallery has to say about Newy's work.  Visit Newy's web page at http://newyfaganstudio.com/

My 3 days with Newy were very inspiring to say the least.
Newy lives on about 19 acres of land near the Ocala National Forest in Central Florida.  She has two horses (a quarter: Buttermilk, who she fondly calls, "Bubby" and a miniature, Lacy), and 3 dogs (whose names I can't recall, but whose kisses I still feel).  Her studio is fabulous.  When I walked in, I wanted to lock the door and stay for awhile.  The materials were nice, but the artwork dispersed all over the studio was wonderful eye candy. I would look, admire, examine it all day -- and did -- for 3 days.  I pretended I was living the Bohemian life style I always wanted to live!  It was great.

I will tell you more about all we did over the next couple of days.  In the meantime, Google Newy Fagan and learn more about her and her art work.